User Guide · 06
Configuring Posting Campaigns: Scheduled Facebook Group Posting in Detail
The 4-step campaign wizard in detail: accounts and posting identity, post items, picking groups from your text or by tags, now / once / recurring schedules, preview & run with skip reasons, and splitting campaigns into time slots.
Updated 2026-09-147 min readFor app v1.7.3
A posting campaign combines "which accounts + which posts + which groups + when" into a task you can run again and again. Click 「New campaign」 on Group Posting (or 「New posting campaign」 on the Dashboard) and follow the 4-step wizard.
Step ①: Accounts
- Lists logged-in accounts that can post, each with its age tier and today's / this hour's posts vs. the limit.
- Accounts that can't post say why: still in the protection period (just registered), restricted, or posting disabled. "Not actually a new account?" takes you to change the account age.
- Posting identity — decided separately from which accounts you ticked above:
- 「Personal + Pages」: post as both; choose personal first (recommended, fewest switches) or Pages first.
- 「Pages only」: the personal identity doesn't post.

Step ②: Post items
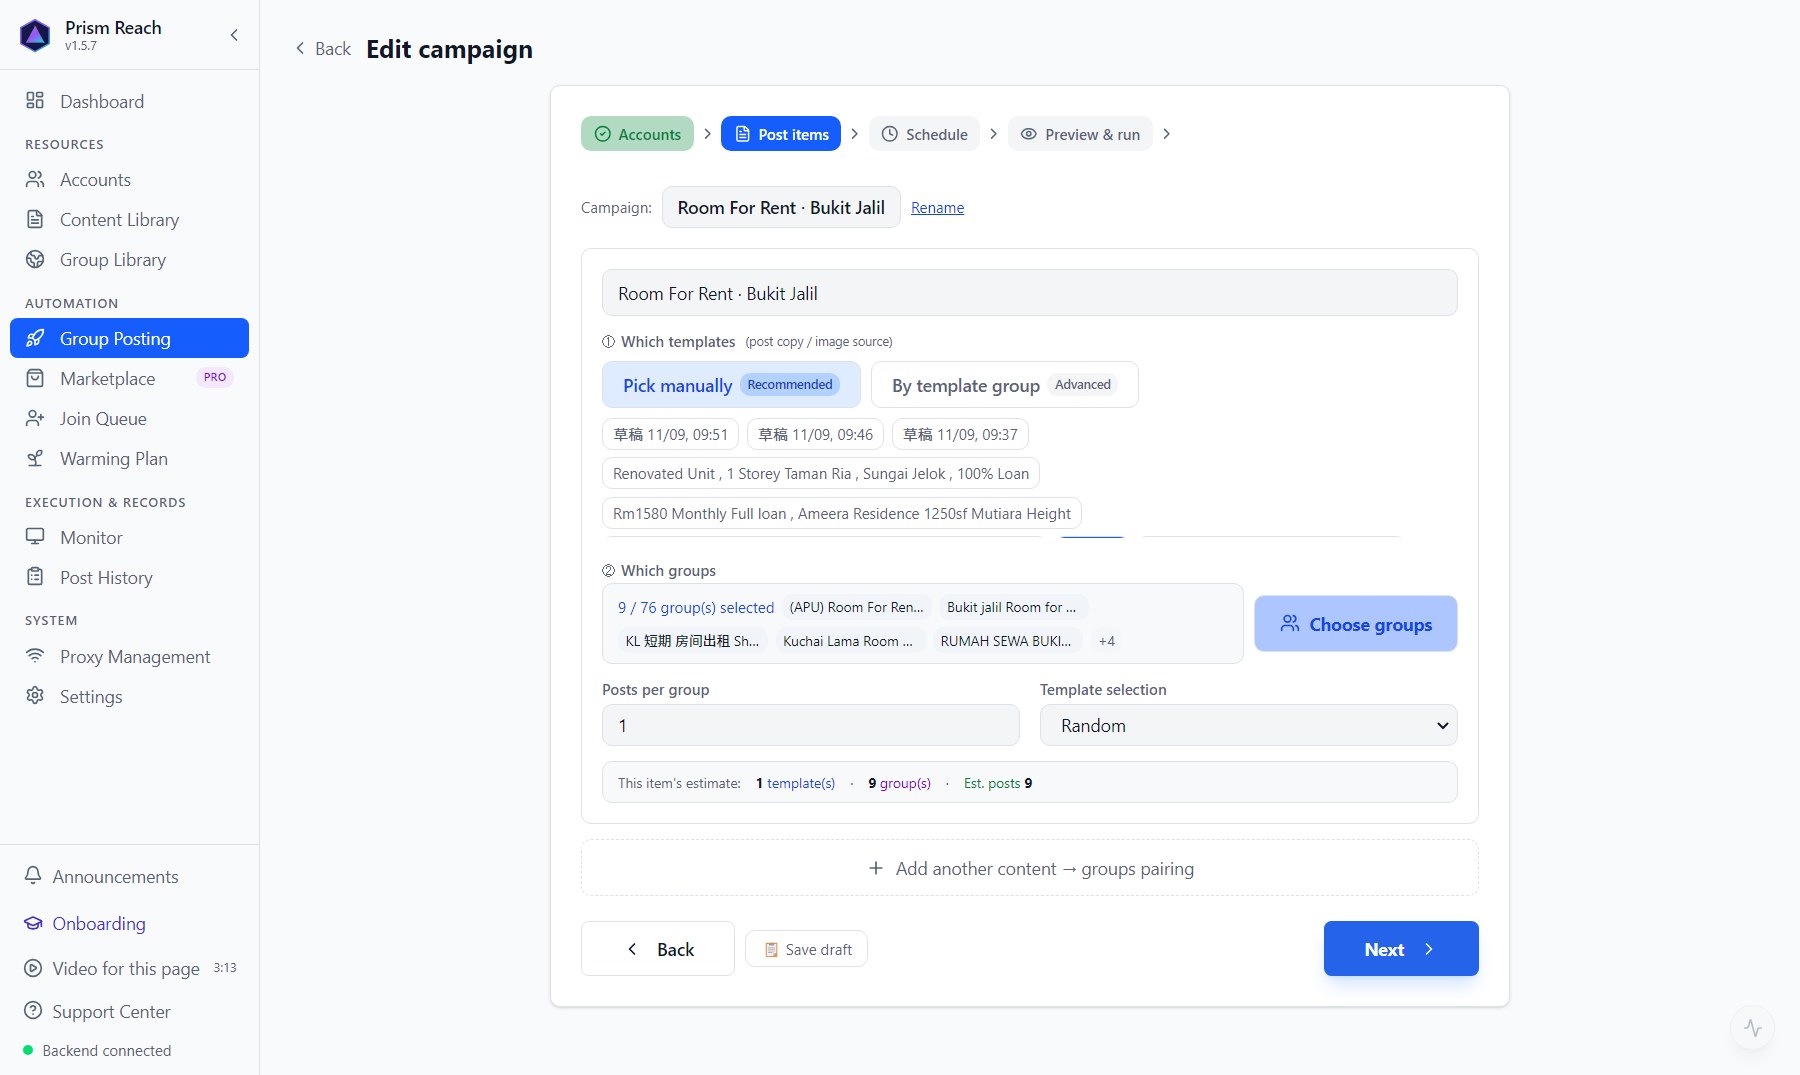
One item = a set of posts → a set of groups, plus how many times per group. You can add several items, e.g. "Bukit Jalil rooms → BJ groups", "Cheras whole units → Cheras groups".
- Which templates: 「Pick manually」 (recommended) or 「By template group」 (advanced, select a whole category). No posts yet? Click 「Quick add」 and write one right here — it's selected automatically.
- Which groups: click 「Choose groups」 to open the group picker (below).
- Posts per group and Template selection: random / sequential.
- The bottom shows a live estimate for the item: "N posts · N groups · about N posts".
The group picker: two ways to pick
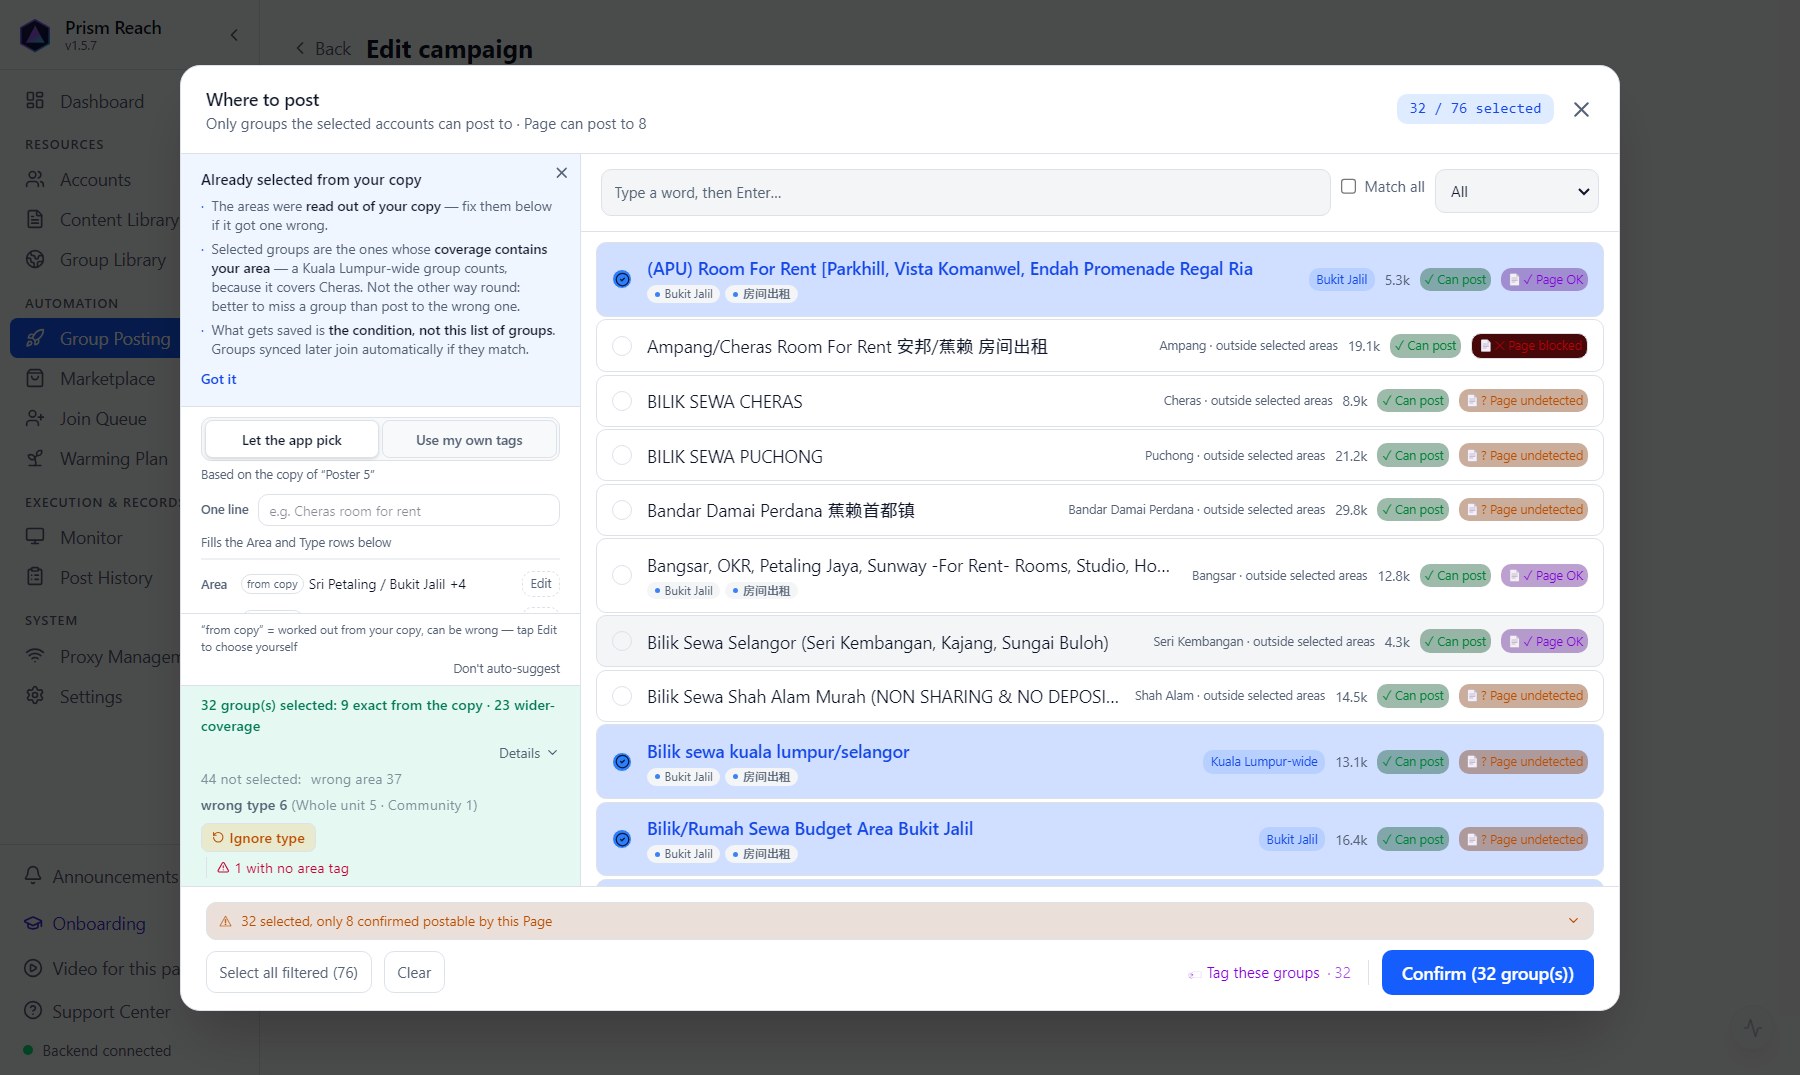
Conditions and reasons on the left, the group list on the right, "N / M selected" at the top right.
「Let the app pick」 (default)
- Reads the post text, works out the area and type, fills them into the 「Area」 and 「Type」 rows on the left, and ticks the matching groups.
- The left side explains: "exact" means the group sits in your area; "wider" means the group covers a bigger area that includes yours (e.g. a "Kuala Lumpur-wide" group also takes Bukit Jalil listings).
- Groups not selected are listed by reason: wrong area, wrong type, group never had an area tag.
- Wrong guess? Click 「Edit」. Want back the groups the type filter dropped? Click 「Ignore type」.
- What gets saved is the condition, not a fixed list of groups: groups synced later that match are included automatically next time.
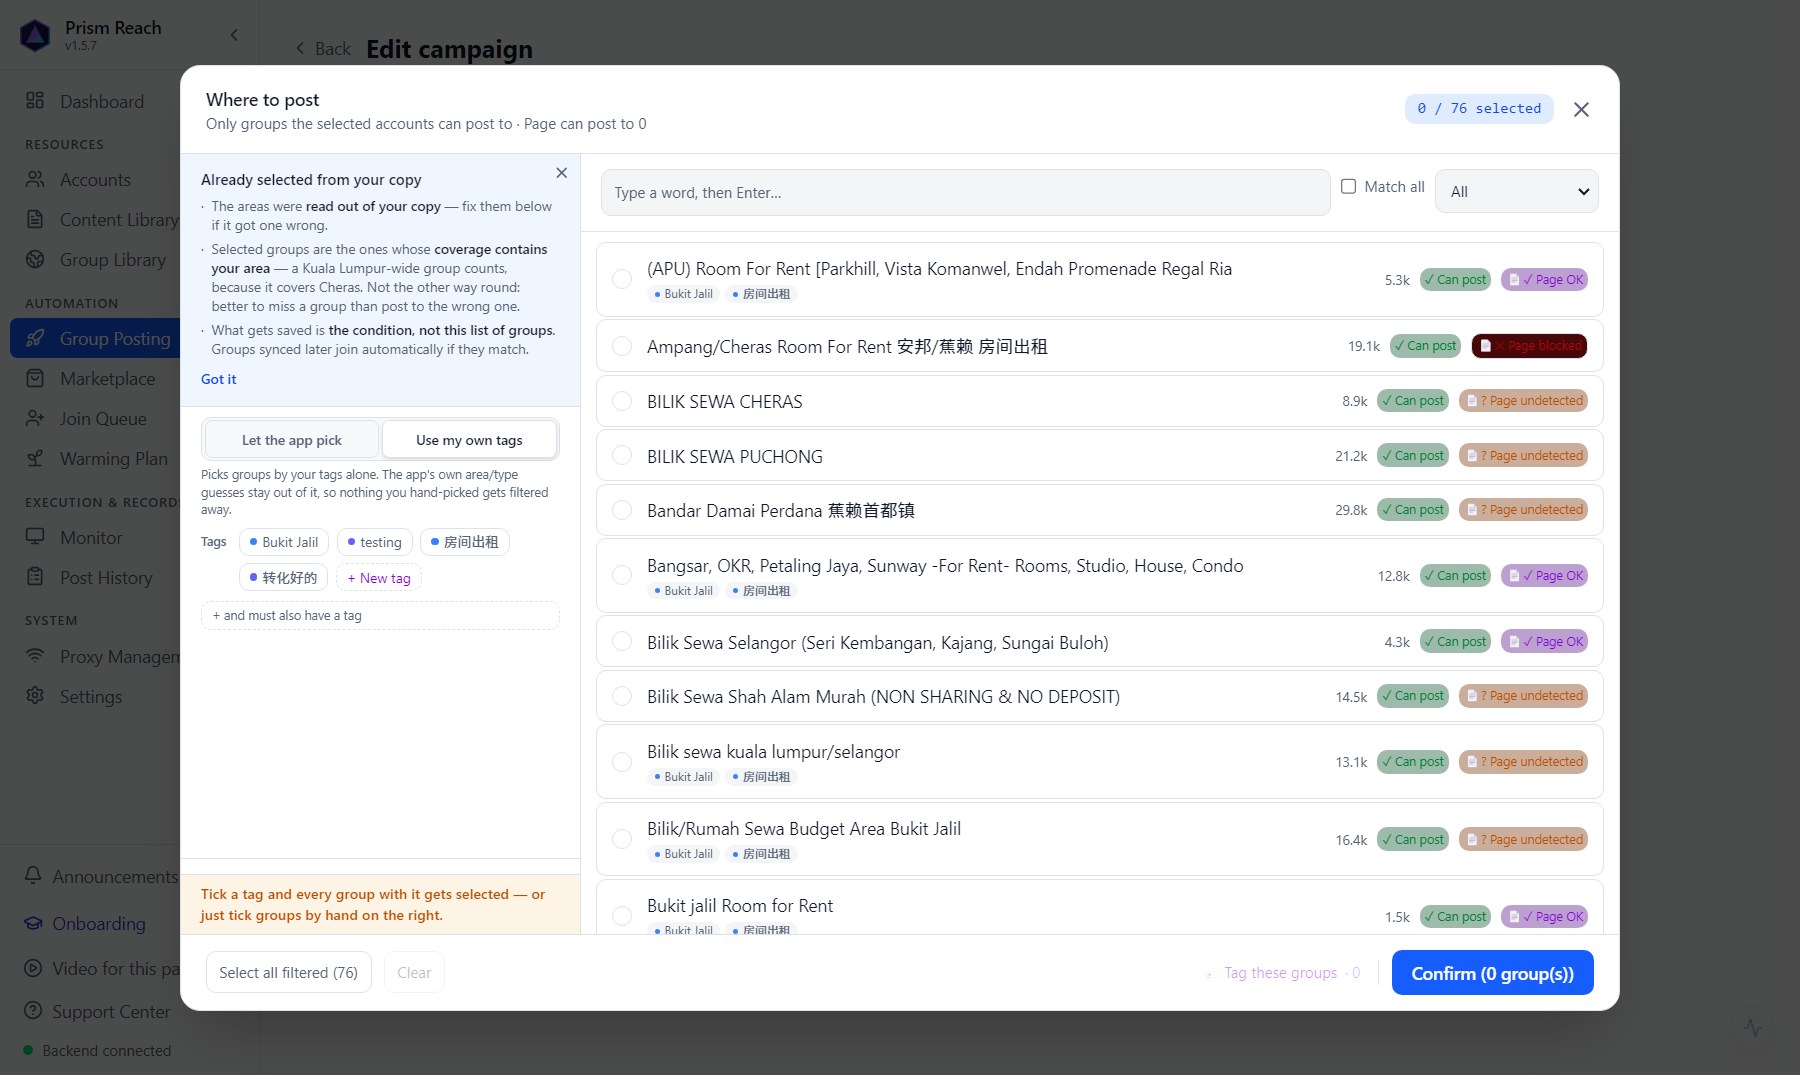
「Use my own tags」
- Picks groups by your own tags only; the app's area/type guesses stay out of it, so nothing you picked gets filtered away.
- Click a tag and every group with it is ticked; you can add "and must also have a tag".
- Or just tick groups by hand on the right.
In both modes you can search on the right and add/remove individual groups. When it looks right, click 「Confirm」 at the bottom right.
Step ③: Schedule
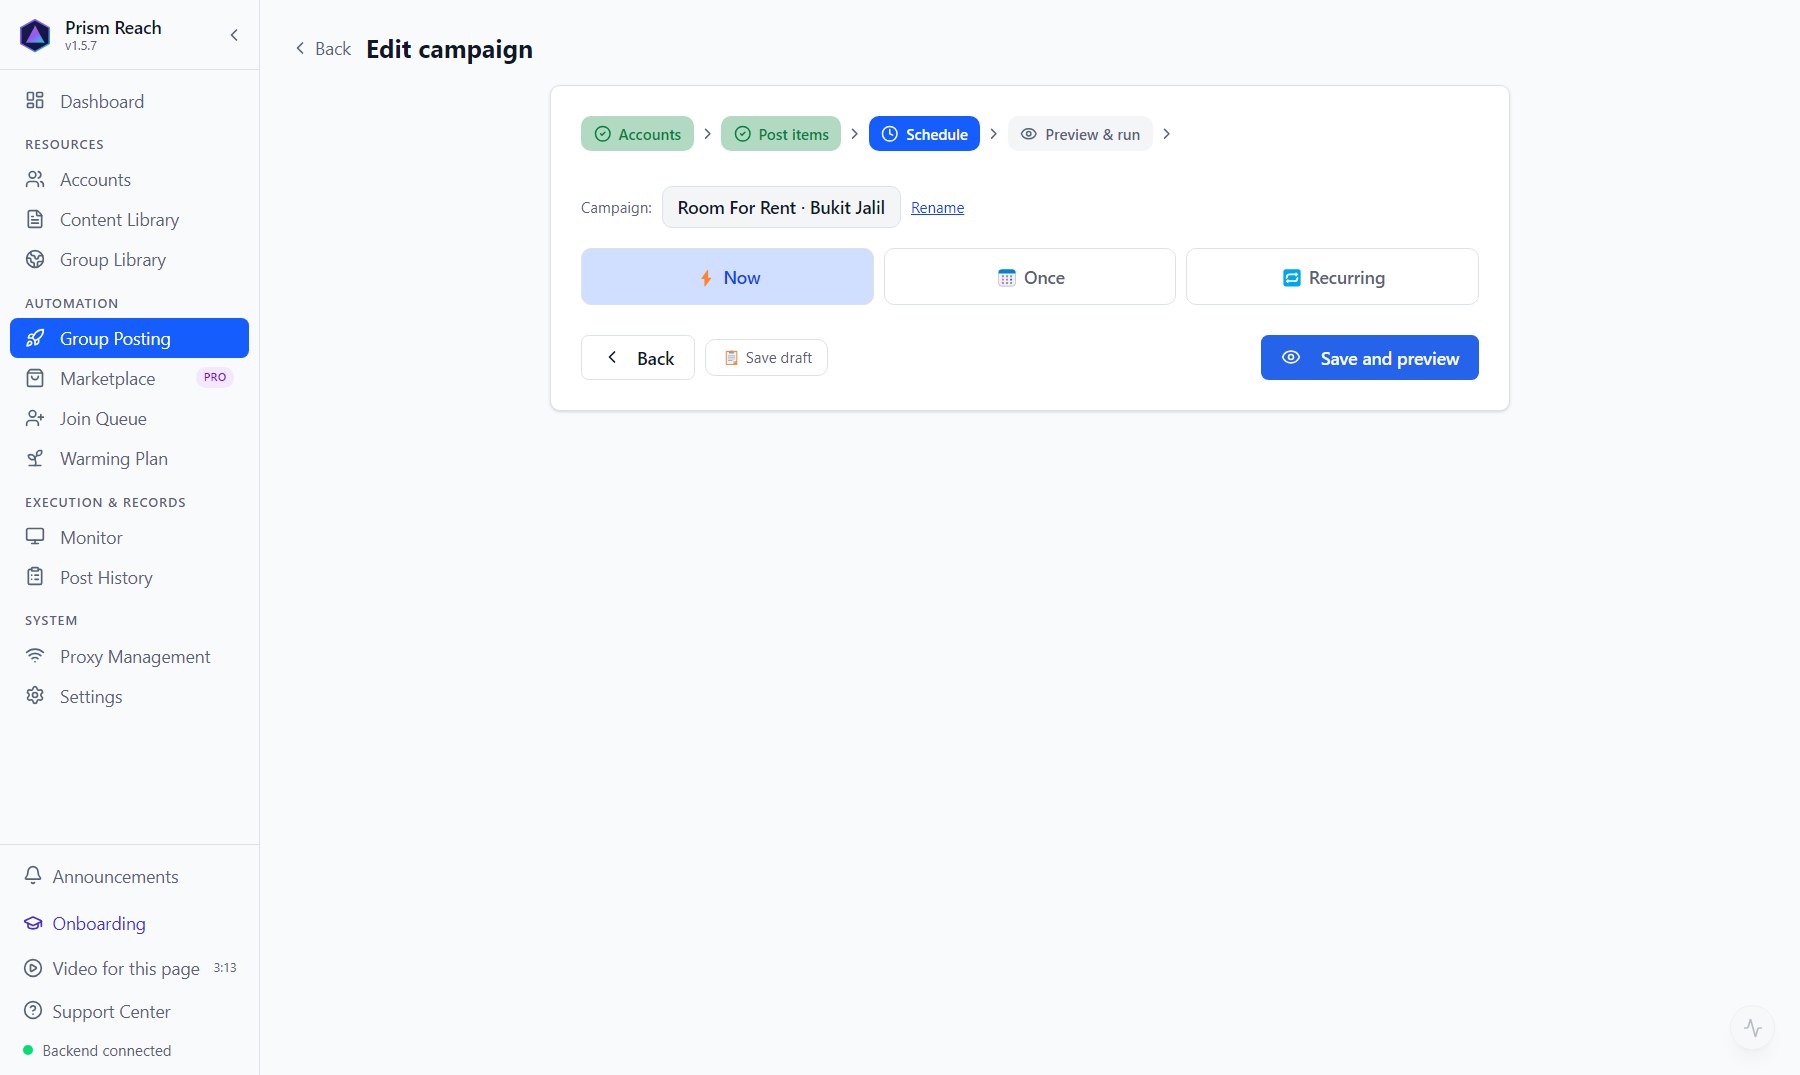
| Type | What it does |
|---|---|
| Now | Runs once right after you confirm |
| Once | A specific time. Choose what happens if the app wasn't open at that time: run late within a tolerance window (recommended) / run however late / skip |
| Recurring | A fixed time each day (optionally only certain weekdays), or every N hours; optionally only within a time window, a maximum number of runs, an end date |
- Random jitter: each run shifts randomly by ±N minutes around the set time, so it never fires at exactly the same second every day — more human.
- Prevent sleep: the app runs on your computer, so scheduled jobs need the computer on and the app in the background. With "prevent sleep" on, the computer won't sleep when a run is close or in progress; the rest of the time it sleeps as usual.
- Runs missed while the app was closed (recurring): skipped by default, then back to normal (so a restart doesn't fire a flood of catch-up posts).
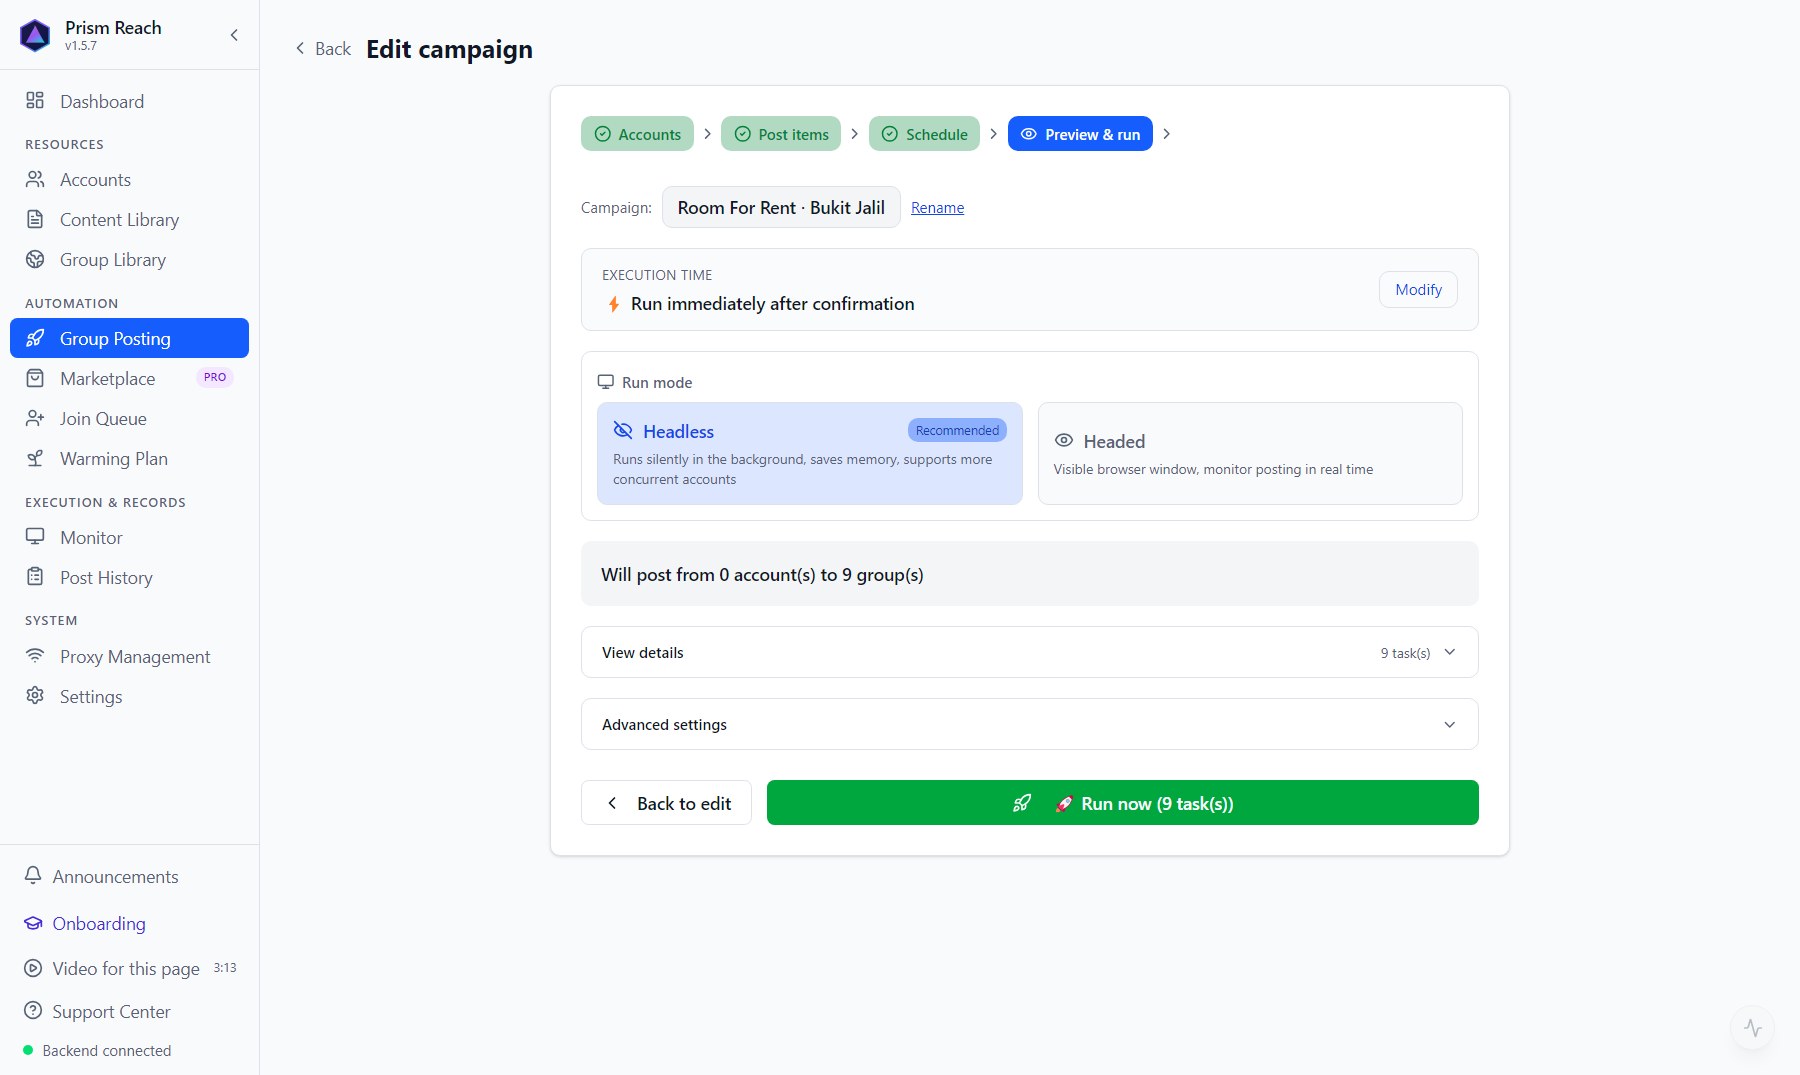
Step ④: Preview & run
Before running, the configuration is expanded into actual tasks and shown to you:
- Execution time, with 「Modify」 to go back.
- Run mode: 「Headless」 (recommended) runs silently in the background, uses less memory, supports more accounts at once; 「Headed」 shows visible browser windows. The very first time you post, a window opens so you can watch, whichever you choose; after that it follows your choice.
- 「Will post from N account(s) to M group(s)」, plus how many groups are skipped this time and why. 「View details」 shows how many tasks each account / Page gets and sample tasks.
- Advanced settings:
- "Post to unchecked groups anyway": the account is in the group, permission just isn't verified — low risk to try. Turned on automatically when more than half of the selected groups are unchecked, so the run isn't nearly empty.
- "Post to groups the account hasn't joined": some groups allow non-members to post; try small batches. To get accounts into these groups, the join queue is the safer route.
- This campaign's posting order and number of parallel accounts (can only be lower than the global setting).
- If "nothing can be sent yet" (e.g. all selected groups unchecked or unjoined), there's a one-click fix button.
When it looks right, click 「Run now」. For Once / Recurring the button reads "Save and schedule" / "Save and enable recurring" and doesn't post immediately.
Common reasons groups are skipped:
| Reason | Meaning | What to do |
|---|---|---|
| Posting permission not checked | The account is in the group but it hasn't been checked yet | Turn on "post to unchecked groups anyway", or check first |
| No account has joined | None of the selected accounts is a member | "Smart join" to add them to the join queue |
| Admin turned posting off | Only admins can post, or the account is muted | Use another group or account — can't be bypassed |
| Buy & sell / announcement group | Buy & sell groups only take items; announcement groups are admin-only | Post to buy & sell groups via Marketplace |
The campaign list: posting again
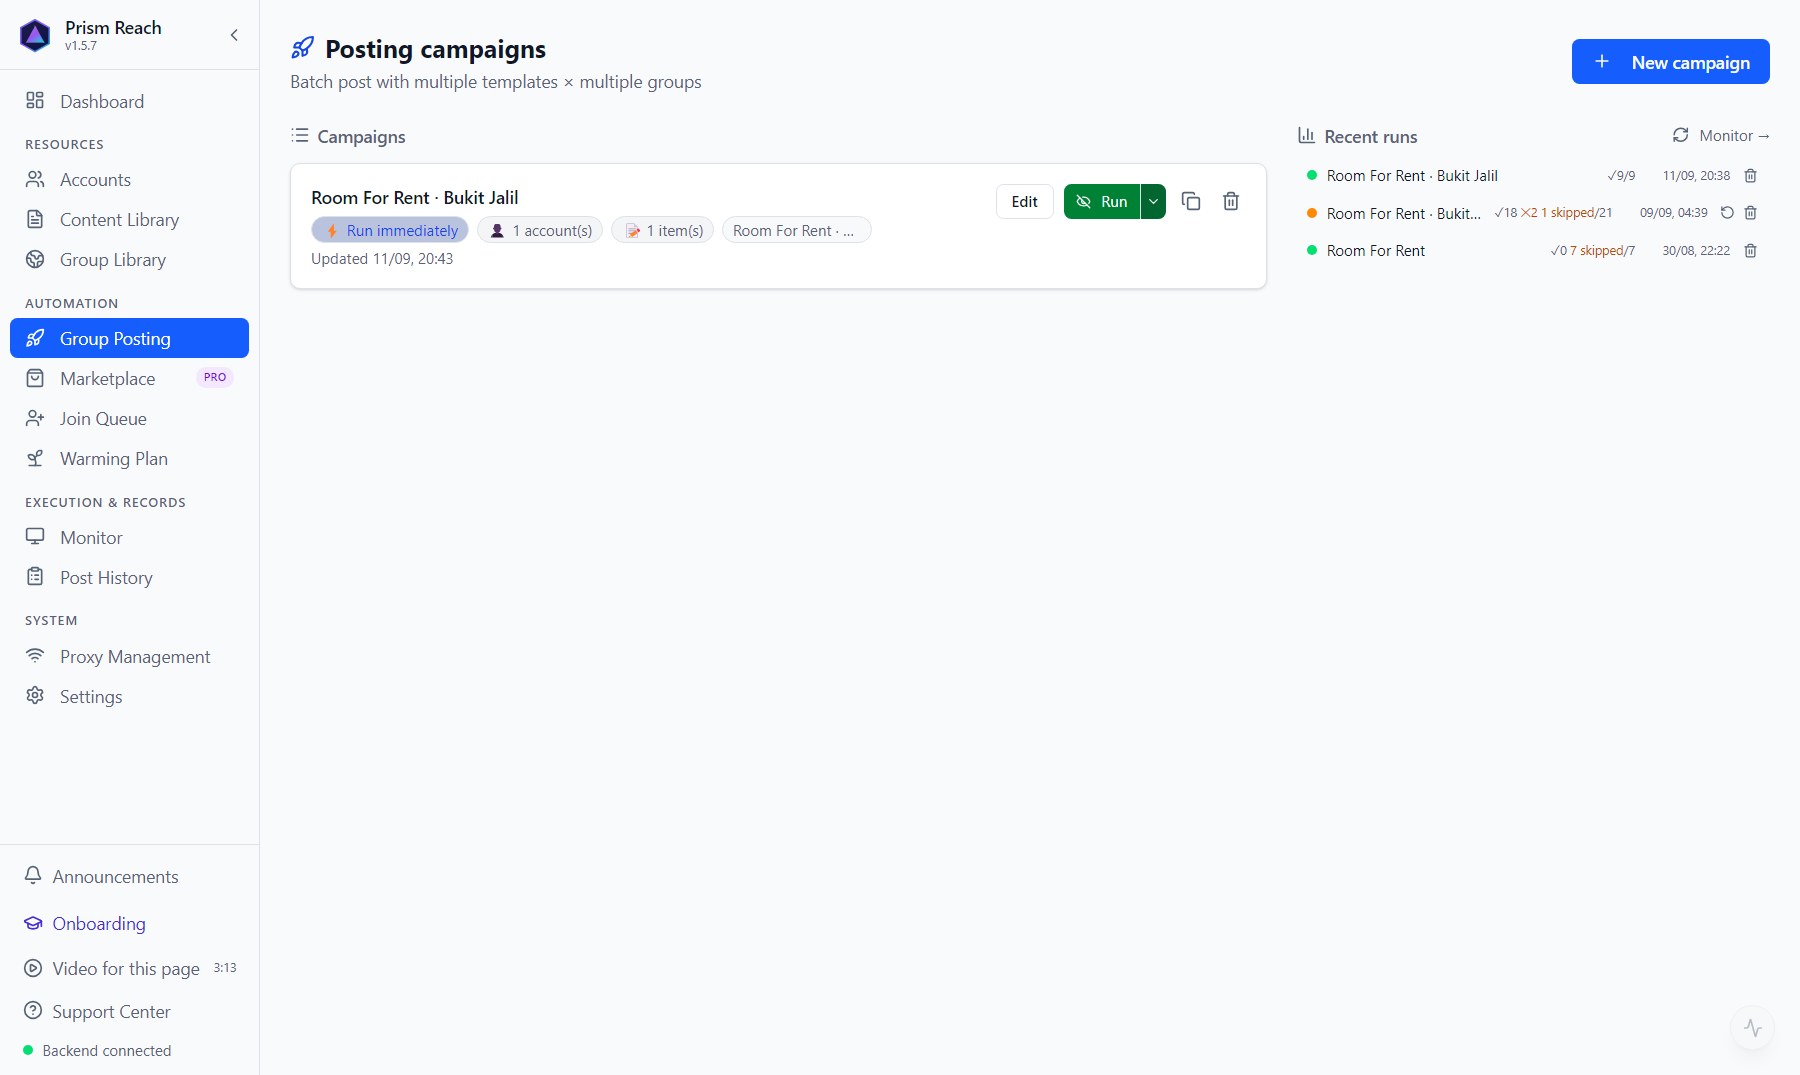
Saved campaigns stay in the campaign list on Group Posting:
- 「Run」: post again. The small arrow next to it chooses headless / headed.
- 「Edit」 to change posts or groups; duplicate; delete.
- Scheduled / recurring campaigns show the next run time and run count; you can stop the schedule.
- 「Recent runs」 on the right: posted / failed / skipped for each batch; click through to the Monitor.
Strategy: splitting campaigns into time slots

The common setup — posting to the same groups three times a day — means each group gets three identical posts daily; admins delete them and Facebook flags duplicates. A better setup:
- Split your groups into three sets (e.g. by area); each time slot posts to one set only — one slot = one posting campaign.
- Put three or four posts in each campaign; it rotates through them, a different one each day.
- Stagger the times: e.g. 8 am, lunchtime and evening, each with schedule → recurring → daily fixed time.
Very busy groups (dozens to hundreds of posts a day) push posts down fast and can be an exception. The three slots are a starting point — run it for a week or two and adjust toward the slots that bring more inquiries.
Posting pace (good to know)
- After each post, the app waits a random time based on account age before the next (longer for new accounts, shorter for aged ones) — human-like throughout.
- With several accounts, "round robin" is the default: each account takes turns posting to one group — longest gaps, lowest risk.
- If Facebook rate-limits an account, the app stops that account and reschedules the rest for later; if everything left is pushed more than an hour out, the batch wraps up automatically, tells you how many were posted and how many remain, and closes the browser.
- All of this is visible and adjustable under Settings → Safety & Limits and Execution engine; campaign-level settings can only be stricter than the global ones, never looser.
Don't have Prism Reach yet?
The free plan needs no credit card — install it and follow this guide.